Sunday, August 29, 2010

Coming October 1st - The Nancy O'Dell Hummingbird Collection

This beautiful collection is the first in a series launched by a partnership between Creative Memories and Nancy O'Dell, an award-winning entertainment journalist and host and an avid scrapbooker.  It was introduced at our recent Showcase convention, and I can't wait to get my hands on mine!

Here is Nancy at the convention:

Here are a couple of screenshots of the collection:  

The collection includes a designer bag that holds everything, including the 12x12 album with a hummingbird design and the exclusive PURPLE Personal Trimmer and PURPLE Tape Runner - just in time, my Personal Trimmer is overdue for replacement (which, by the way has a life expectancy of 50,000 cuts).  The whole collection will cost $231.75 (plus s/h/t) but will have some components will also be available a la carte.  If you would like to pre-order your collection, contact me and I'll order it on October 1st, the first day it is on sale and I won't charge your credit card until that day!

Saturday, August 28, 2010

Another request!

Keep those requests coming, ladies!  I love sharing what I've learned with SBC+ and can always use your ideas.  Here is a great way to showcase a special photo like this one from the bottom of the Grand Canyon.

1. I started by placing my photo on the page and making it large enough to cover the whole page.


2. Right-click on the photo to bring up the menu box, select “Copy”, then “Paste” the photo over top of the original.


3. Mat the new copy by selecting the “Format Photos” ribbon, select Mat, select “Change Mat Fill” , “Select a Color”, choose your colour and click “OK”, then change your width to 2 and click “Accept”.


4. I then right-clicked on the new photo to bring up the menu box, choose Properties (last option).


5. In Properties, I changed my units to inches, and reduced my width by 0.5” (if you keep the Aspect Ratio locked, this will change the height proportionately as well.) It should automatically be centered over the original when you pasted as well.


6. Repeat Steps 2-5 three more times. Enjoy!

Wednesday, August 25, 2010

Creating invitations in Storybook Creator Plus

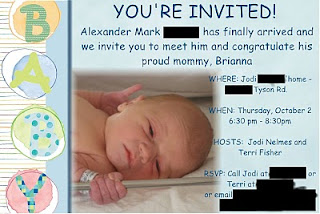
Thanks to my friend and customer, Heather, I hammered out the instructions how to create cute 4x6 invitations in Storybook Creator Plus like this one!

(Not to worry, I did send with the right information!  I just don't want to share too much personal stuff here!)


Here's how to do it (assuming you know how to use Storybook Creator Plus already!) Open up the program and:


1. Create a new project.
2. Scroll through “Select a Project Type” and choose either 4x6 Portrait or 4x6 Landscape.

3. Select Blank Template.

4. Click Next (you’re skipping over the auto-populate)

5. Name the project – I use 4x6 Portrait (or Landscape) and then use this project for all my invitations, etc. so I don’t have too many on the go.

6. Click Create.

 
Complete your project! Once you have finished it and are happy with it, here’s the next part of the process.
1. Make sure you are in the Home Tab/Ribbon.

2. In the Project Box, click the down arrow below the Save button.

3. Select “Save Pages As” (a new box will pop up)

4. Click Save.

 
Now to email:

1. Compose your email.

2. Attach the file – you’ll probably find it in Your Name/Creative Memories (If you start doing a lot of invites/page prints/decorated photos, you might want to set up a folder called Individual Pages – I can help you with this).

3. Choose your recipients and SEND!!


Hope you enjoy trying this out - I've used it for everything from Change of Address cards to Birthday invitations to Workshop Schedules, even for a funeral card.


Sunday, August 15, 2010

Welcome!

I'm glad you found me!  This is my new virtual workshop, where you can view & share page layouts, learn new ideas and just have fun.  I'm kicking this off with a new project (like I need to start anymore) but I can't help it - I love the Simply Beautiful Power Palette and the colours are so me, I'm redoing my baby scrapbook that is falling apart.  Here is the title page, done with Storybook Creator Plus 3.0, exclusively available from Creative Memories:

Details: Simply Beautiful Power Palette, Scallop Border from Delight Power Palette freebies.

Handwriting by my mother, Mary Fisher and scanned from the original book!  It isn't difficult to do and adds a special touch. 


I'm only doing select pages digitally for this album (ordering them as Page Prints from CM Digital Center).  So far I have done 8 pages traditionally, plus a couple pages are going to be a combination of traditional and digital.  I plan to add a couple of flowers to the page above, just so it is demensional like the other pages.  I'll put all the pages together in a Plumberry coverset on regular pages with page protectors.

So now that I've shared my newest project, will you share yours?  Email me or come to a workshop with a picture or two of your latest project and a brief description of what inspired you to do it and I'll share it here.  I have a gift for everyone who shares by August 31st.